Documentation
Installing
After purchasing the plugin, unzip the received archive. It will contain: plugin archive, documentation, license. On your site, go to the plugins section – “Add new”. Next to the “Add Plugins” heading, click the “Upload Plugin” button. Select the plugin archive and click install. If a free version of the plugin is already installed on your site, first disable it. After installing the plugin, click “Activate”. The plugin is ready to go. In order for everything to work correctly, you should definitely add services and employees. After adding, place the shortcode [oz_template] on the page where you want to see the booking form.

Services – Add, Configure
After installing the plugin, add services. Adding services is like adding standard posts or pages to WordPress
In services, be sure to fill in the following fields:
- Title – service name
- Duration of service (in minutes)
Optional fields:
- Service Description
- Price
- Deposit settings:
This option is needed if you plan to let your visitors pay only a part of the cost of the service.- Deposit – cost value
- Deposit type – percent or fixed amount
- Badge – like “Hit” “On Sale”. Shown in the service card
- Remote – if this service is provided remotely (video conference)
- Service Category
- Recurring settings:
This option is needed if the service is repeated in time. Something like a subscription- Recurring type:
- Always – customer can choose any type
- Daily – appointments will be generated daily
- Weekly – appointments will be generated weekly
- Monthly – appointments will be generated monthly
- Minimum count – the minimum number of appointments that a client can generate
- Maximum count – the maximum number of appointments that a client can generate
- Processing payments for recurring appointments – pay all or only first apppointment
- Recurring type:
After filling out the service, click the Publish / Update button.
Employees – add, configure
After adding services, you can start adding employees.
For employees, be sure to fill out the following fields:
- Title – Employee Name
- Employee schedule (see section Schedule settings)
Optional fields:
- Employee Image
- Employee Description
- Specialty
- Individual time interval in the booking form, different from the general settings of the booking form (see the general settings section)
- Breaks
- Weekends
- Services provided – there are three types of choices. By default, an employee provides all the services that you have added. If you want to exclude some of the services, then select the appropriate option. If on the contrary, the employee provides only certain services, then select the option “Only indicated below” and list the services that he provides
- Assign an employee to WordPress users – works only when the “Add a page for employees” setting is enabled (see the section Adding a Personal Account for Employees)
- Google Calendar Settings – only works when the “Add a page for employees” setting is enabled (see the section Adding a Personal Account for Employees)
- Branch – if you have several departments, you can specify in which of them the employee works. In this case, the “Choose a branch” step will appear in the booking form
After filling in all the fields, click the Publish / Update button. After that, a calendar will appear on the employee’s editing page with his schedule and his appointments.

Schedule settings
The plugin provides three types of schedules:
Constant schedule – to add such a schedule to the employee, select it, click the “Add a new line” button, select the days of the week and the time period in which the employee works. After filling in all the fields, click the add button. If an employee works on different schedules on different days, then you can click the “Add a new line” button again and indicate what hours the employee works on other days. Do not forget to publish the employee after adding / making all changes to the employee.

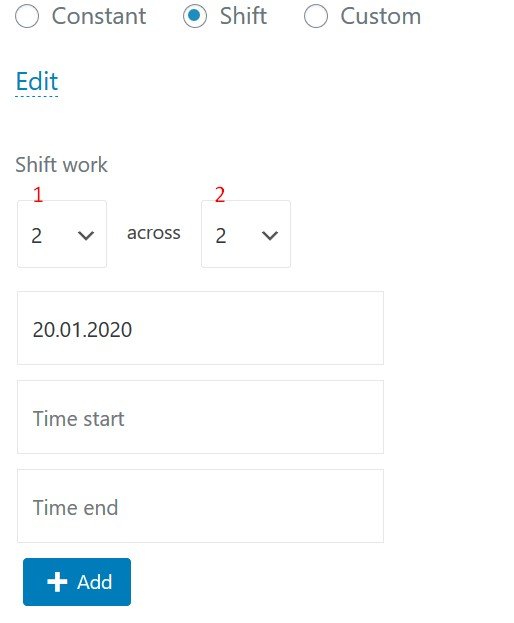
Shift schedule – This schedule is suitable for employees whose work cycle is constantly repeating. For example, an employee always works 2 days in a row, and then rests for 2 days in a row. To add this type of schedule, select it in the list. Click the “Change” button. We indicate the first number is the number of working days, the second number is the number of days off. We indicate the date of any first work shift so that the plugin can begin the counting of the schedule shift. And the working time, after which we click the “Add” button. Do not forget to publish the employee after adding / making all changes to the employee.
Custom schedule- if an employee always works differently, then choose this type of schedule. On the calendar, note the necessary dates and indicate the time of work on these days. Do not forget to publish the employee after adding / making all changes to the employee.

Breaks and daysoff
The plugin allows you to set breaks in the employee’s work schedule (for example, lunch break). The functionality for adding breaks is very similar to the functionality for adding a constant work schedule: select days, assign a break range, add a break.

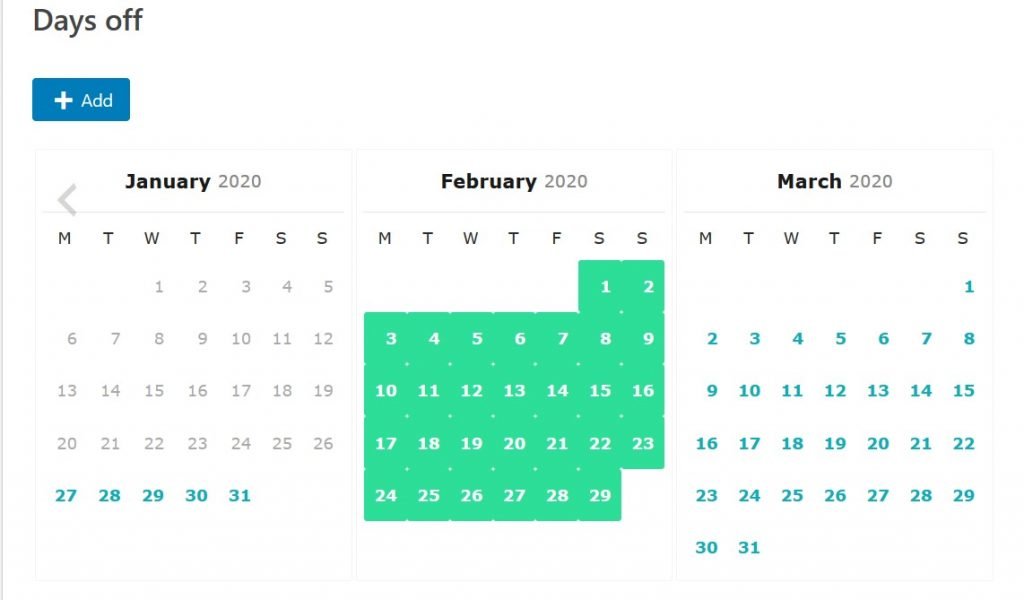
The daysoff functionality is needed in order not to change the employee’s schedule in case the employee, for example, takes a vacation, gets sick or takes leave. To do this, mark on the daysoff calendar the dates on which the employee will be unavailable.
Adding a personal account for employees
This functionality is designed so that employees can receive individual sms and email notifications when customers book an appointment for them to the service. Also, this function allows an employee to edit information about himself / herself, change his work schedule, and also assign his Google calendar to his account. In order for this functionality to work, you must enable the option in the settings of the plugin “Add page for employees” – the tab Main settings. After that, you need to restart the plugin (in the plugin settings, first deactivate, and then activate the plugin).
Important! Check WordPress permalinks settings (General – Permalinks). Common settings should be: Post name. In any case, save these settings again (if you see 404 error on the employee’s page)
After enabling the option, create employee accounts in the WordPress system (Users – Add). Specify the role – Employee.
After that, go to the employee’s page and indicate which account should be assigned to the page of the selected employee. Employees who have access to an account on your site will only see their pages. If possible, they can specify their phone number for sms notifications, email, as well as assign a Google calendar account to receive information about new appointments directly to the calendar.

Employee’s personal account and registration form
Starting with version 3.0.5, our plugin has a more convenient personal account for an employee. To start using it, you need to create a blank page (in the pages section). The name can be anything, for example – Employee’s personal account. After that, go to the settings of our plugin and find the option “Employee’s personal account page”. In it, you must select this page – Employee’s personal account. After that, if you go to this page, you will see either a calendar and employee settings (if you are authorized on the site) or a registration / authorization form.
Personal account

Registration / auth form
Сhange the order of employees (sorting)
To change the order of output of employees on the page, just change its publication date. The farther the publication date is from the current day, then lower the employee will be displayed on the page.
Plugin Settings
Date format and time zone
To change the date and time zone format settings, go to the basic WordPress settings and select the desired values.

Basic Settings
Who can manage calendar – user with selected roles can edit and see all services, employees and appointments, as well as plugin settings (with enabled option) on your site.
Frontend Engine plugin frontend engine. if you do not know what it is, then it is better to choose V3
Sequence of steps sequence of steps in the booking form
View option – by default in the form of a shortcode. You can specify that the plugin works in a popup window. A fixed “Booking online” button will appear, which call up a pop-up window with a booking form.
Template is “Default” by default. Options for the external design of the booking form.
Currency – text field. The field value will be displayed in service prices.
AM / PM time format – displays the time values in the booking form in AM / PM format
Add area for users – enable user area for customers.

Add profile page for employees – enable ability employees to edit their pages. Also makes on the site personal pages for each employee

Employee’s personal account page – enable ability users to register on your site as employees and manage their accounts from the frontend
Allow customer to register – display the “Register me” checkbox in the booking form. If the option “Add area for users” is enabled
Color options – allows you to set your own color for the design of the main elements of the booking form. The first color is the main color, the second color is the color when you hover over the buttons on the form.
Register plugin to get auto updates – when you get the purchase code on the Envato website, you can receive the latest plugin updates (if paid support for the plugin is active)
Appointment settings
Multiselect for services – allows customers to choose several services at once when booking.
Time slot duration – sets the step for time cells in booking form
Max month for calendar display on front (from now) – sets the maximum date available for the appointment. Works like this: the current day (when the customer visits the site for booking) + the number of months.
Min time for booking (from now) – sets the minimum date and time for showing to the customer. Works like this: the current day (when the customer visits the site for booking) + the number of hours / days set by the option. Before this time, the customer will not be able to book an appointment.
Min time for canceling booking (from now and only for logged in users) – the principle of operation is the same as in previous options. Works for clients when the Add area for users setting is enabled
Аppointment statuses – this option adds statuses to the appointments: approved, on hold, canceled. This option is needed, for example, so that the time selected by the customer becomes unavailable only after the appointment is confirmed by the site administrator.
How will the booking start – sets the sequence of steps for the booking form. By default, the first step is to select an employee.
Redirect to this URL after successful appointment – if you specify a link here, then after a successful appointment the customer will redirect to the specified page. This can be useful if, for example, you want to give the user additional information after a successful appointment.
Skip step if one employee / service – show the steps in the booking form if one employee or service is available for selection. For example, the form will skip the step with choosing a service if only one service is available for selection.
Enable push notifications (Firebase) – after online booking, a push notification will be sent to the browser. Learn more about technology: https://firebase.google.com/docs/cloud-messaging
Form Settings (Custom Fields)
Form fields – shows which fields should be displayed by default and which fields are required. The name field is always required. For the telephone field, you can specify your own placeholder for one of the countries.
Custom form fields – allows you to add your own fields to the form. To add a field, click the “Add Field” button.
1. Field order on the booking form
2. Name of an custom field
3. Field type – 4 field types are provided:
Plain text box
Text area – a text field that allows you to leave more detailed data (for example, a comment)
Select – drop-down list with options
Checkbox – regular list with option
4. Required – by default, the field is optional.

Email marketing
Email to notification – indicate the email to whom the email should be sent about the new appointment. If the field is empty, the email will be sent to the site administrator.
From name (name) – the name of the sender, which will be indicated in the emails sent. If the field is empty, the site name will be displayed.
From (email) – when the email arrives to customer, this sender address will be indicated. If the field is empty, the email will be of the form wordpress@your_domain_address
Next are the settings for the templates sent by email.
Templates support HTML layout. By default, a plugin template is inserted, but you can change it to your own html template or just a text message. The following options are provided in the template settings:
Enable – whether to send this email message or not
Email title – email subject line
Email template when user has booked an appointment – a text editor with an email message. You can insert a shortcode of the appointment value in the subject of the email and message body – for example, date or time of appointment, client name, etc. The list of available shortcodes is presented to the left of the text editor.
Payment Options
If you want your customers to pay for the appointment on the site, then you need to enable this option. After that, the following payment methods are available:
Pay locally – if customers will pay for the online appointment not on the site but on the spot, you need to activate this option
Payment method – PayPal – in order for this method to work, you need to specify the email address of your business PayPal account. You must also choose in what currency you will accept payments (option Paypal Currency ). Options are also available on which page to redirect the user after a successful and unsuccessful payment.
Payment method – Stripe – for this payment method to work, you need to enter the keys that can be obtained in your Stripe account: https://dashboard.stripe.com/test/apikeys (Developers – API keys). You must also choose in which currency you will accept payments (option Stripe currency ). Options are also available on which page to redirect the user after a successful and unsuccessful payment.
Payment method – Yookassa (ex. Yandex kassa) – for this payment method to work, you need to enter Shop ID, Secret key that can be obtained in your Yookassa account. You must also choose in which currency you will accept payments. Options are also available on which page to redirect the user after a successful payment.
Don’t create an appointment if there is no payment – you will most likely need this option. activate it by default
Discounts – the functionality allows you to add a field for entering a discount coupon in the booking form. To create a discount coupon, you need to specify a coupon code (the coupon will be activated when this code is entered correctly in the booking form), by which date the coupon is valid and discount size . You can also optionally indicate the maximum discount amount (in the installed currency of the plugin), for which services or employees this coupon is applicable.
SMS
To receive SMS about a new appointment, you need to activate the option “Enable SMS integration” and configure one of the proposed SMS notification services – Twilio or SMSC.
After entering the settings, you can set SMS notification templates for the following events:
1. about the new appointment to the administrator,
2. about the new appointment to the customer,
3. appointment reminder to the customer (how many minutes this reminder comes to the customer, the customer chooses when book an appointment),
4. default text for changing status (if the option “Apointment statuses” is enabled)
Also, when changing the message text, it is possible to use shortcodes with information about the appointment. Shortcode values are shown next to the message box.
Integration
Google Calendar – activates the integration of appointments with google admin calendar. To work, you need to enter your email address, Client ID and Client Secret.
Google reCAPTCHA v2 – adds a “I’m not a robot” spam protection box to the booking form. To work, you need to enter the Site Key and Secret Key. You need to get them here: https://www.google.com/u/3/recaptcha/admin/
Woocommerce – activates the ability to make a reservation payment through the Woocommerce plugin
Google Calendar (video)
Woocommerce
There are two payment methods built into our plugin: Stripe and Paypal. If you need another method, then the Woocommerce plugin is suitable for this. With it, you can connect 50+ different payment methods. Our plugin has the ability to integrate with Woocommerce. To enable integration, turn off all other payment methods in our plugin and activate integration with Woocommerce (integration tab – Woocommerce. If this option is not available, first install and configure Woocommerce). If everything is set up correctly, then after booking, users will be redirected to the Woocommerce checkout page, where they can pay for their appointment. (Checkout form can be opened in the new window if V3 engine is enabled)
Conference video
If you provide services remotely – telemedicine, tutoring, etc. our plugin has the ability to provide video conferences in the format of a employee-client (please check plans with our support team). After booking the time, a room for 2 users will be created for this appointment at the appointed time. In it, you or your employees will be able to contact the client via video, as well as exchange text messages. In order to use this feature, you must register your plugin. To do this, enter your purchase code in the Register plugin to get auto updates. If the registration was successful, then you will see how much support is active. The possibility of video conferencing is available if the support period has not expired.
If the registration was successful, create a blank page and copy its ID.

Go to the plugin settings and specify this ID in the Page ID for conference option. Next, in the Email marketing tab, you need to insert a link to the video conference in the email template for the administrator and client. The shortcode %conference_url% is suitable for this.
After that, you need to create services. When creating a service, you need to indicate that the service is provided remotely.

Now, when booking remote services, the user will receive a link to the video conference via email. The room will be available at the appointed time. The duration of the action is equal to the duration of the service.
Mobile App (Android beta)
With our app you can view your appointments in a convenient calendar and receive push notifications about new appointments.
1. Get in for Android on Google play
2. After initialization, you will see a list of available sites. Contact us if you want to add your site to this list: client@oz-plugin.ru
3. Choose your site.
4. Log in on your site via app and approve connection to your account
Video instruction:
Shortcodes
[oz_template] or [ozapp] – The main shortcode. Used to display the booking form on the page.
Available attributes:
services – used to display certain services. For output, you must specify the id of the services that should be displayed in the id parameter, separated by commas. If you do not specify this attribute, then all active services are displayed.
Example:
[oz_template services="id=1,2,3"]
branches – displays employees by branch id. For output, you must specify the id of the branches separated by commas. If you do not specify this attribute, all active specialists are displayed..
Example:
[oz_template branches="3" ]
employee – displays employee by ID. Shows only one employee on the page
Example:
[oz_template employee="2" ]
[ozempcalendar] – shows employee appointment calendar. Demo: demo
Available attributes:
id – employee ID
height – calendar height (CSS property)
Example:
[ozempcalendar id="2381"]
JS Events
ozBookSend – trigger after a successful appointment.
Params:
e.detail.response.id – Appoitnment ID
Example (measure events with google analytics):
document.addEventListener('ozBookSend',function(e){

ga('send', 'event', 'order', 'EVENT_NAME');

},false);
Hooks/filters
do_action('book_oz_send_ok',$suc);
Fires once an appointment has been added (from booking form).
Params
$suc – Appointment ID
apply_filters('book_oz_time_duration',array $min);
Filters the time slot duration in the Appointment settings tab.
Params
$min – return array with time slot duration values in minutes (default array(15,30,60,120))
apply_filters('book_oz_pers_timeslot_duration',array $time);
Filters Individual time slot duration of Employee.
Params
$time – return array with time slot duration values in minutes (array(’15’ => ’15 Minutes’, ’30’ => ’30 Minutes’ etc))
apply_filters('oz_service_duration',array $time);
Filters the service duration time.
Params
$time – return array with service duration values in minutes (array(’15’ => 15, ’30’ => 30 etc))
apply_filters('book_oz_sms_shortcodes',$codes, $id);
Filter list of sms shortcodes.
Params
$id – Appointment ID
$codes – return array with shortcodes
Example:

add_filter('book_oz_sms_shortcodes', 'oz_custom_sms_shortcodes');

function oz_custom_sms_shortcodes($codes) {

$codes[] = 'oz_custom_code';

return $codes;

}

add_shortcode( 'oz_custom_code', 'oz_custom_code_func' );

function oz_custom_code_func( $atts ) {

$name = (isset($atts['id'])) ? 'Custom short: '.get_the_title($atts['id']) : '' ;

return $name;

}
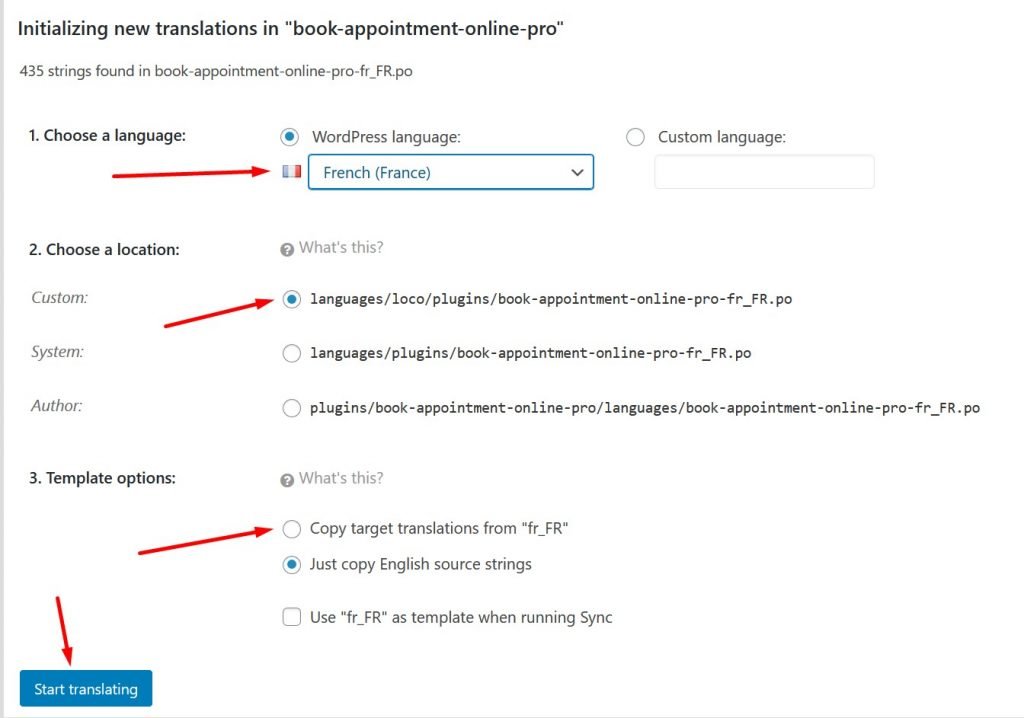
Translation/renaming strings
If you want to add a translation into your language in the plugin, we recommend that you do this using the Loco Translate plugin. Add this plugin to your website, then go into it and in the list of plugins find Book an appointment online PRO

In the window that opens, select a new language or copy the current one (if you want to rename some strings of an existing language).
After that, the window for preparing for translation will open. Select the language you want to translate. Choose an custom location (so that when updating the plugin, your translations will not be erased). If you are copying an existing language, select whether to copy the translation or not (3. Template options). After that, you can start doing the translation.
Plugin updates
Activate the plugin to get updates automatically, as well as for additional features. To receive automatic updates enter your purchase code (article on the topic, Where Is My Purchase Code? ). If the code is entered successfully, automatic updates are available at a time that you will see.
If an update is available, then it should be shown below the plugin description in the general list of plugins.

Also, if you are sure that an update should be, try checking for available updates manually.
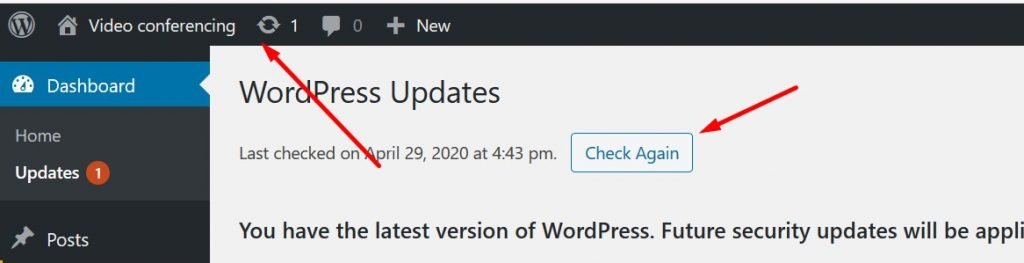
Even if updates are not shown, you can always download the latest version of the plugin in your Codecanyon account
Examples and troubleshooting
Don’t hide the occupied time slots
If you don’t want hide the occupied time slots then add this styles in the Additional CSS of your active theme
Example:
.oz_busy, .oz_breaks:not(.oz_not_allowed), .no_slots, .oz_today_past {

display:inline-block !important;

}

.oz_busy label, .oz_breaks label, .oz_today_past label {

background: #f20505 !important;

color: #000 !important;

}
Reminders don’t come
Such a problem may be if the standard WordPress scheduler does not work. To solve this problem, you can create a cron job on your server manually.
1. Open your site’s wp-config.php in your text editor.
2. After the lines containing your database credentials, add the following lines:
define('ALTERNATE_WP_CRON', true);

define('DISABLE_WP_CRON', true);
3. On your hosting add a new cron task – every two minutes run this command wget -q -O - https://YOUR_SITE_URL/wp-cron.php?doing_wp_cron >/dev/null 2>&1
If you using Cpanel then cron jobs you can set here:

After adding the task you will see something like (Cpanel example):
![]()